REVIEW · SEATTLE
Stained Glass Magic Class in Everett
Book on Viator →Operated by FEELartistic Studio · Bookable on Viator
Stained glass, in a small class. That is the hook here: you get guided help to create a finished stained-glass item you can take home from FEELartistic Studio in Everett. I like how beginner-friendly the step-by-step instruction feels, and I also like that the class includes the materials so you are not hunting down supplies or tools. The only real consideration is that it runs about 1 hour 30 minutes, so you will want to arrive ready to focus and work at a steady pace.
This is designed for people brand new to stained glass, and also for folks who want a refresher after a beginning class. With a maximum group size of 4, you should expect real guidance rather than a crowded demo where you fall behind. The vibe from the studio is laid back, so you are not expected to be an artist before you walk in.
At $89 per person, you are paying for more than watching someone else work. You are paying for a complete process, from picking a design template to adding a hanger and soldering your glass pieces, then walking out with what you made. If you hate hands-on tasks, this might not be your thing. But if you like the idea of learning a real craft step-by-step, it is a strong value.
In This Review
- Key highlights from this stained glass class
- Stop at FEELartistic Studio: where you make it, not just watch it
- Picking your design template and getting oriented fast
- Copper foil, a hanger, and soldering: the core skills you will actually use
- Adding copper foil
- Adding a hanger
- Soldering the glass pieces
- Why a max-4 group makes the instruction feel relaxed
- Price and value of the $89 workshop with supplies included
- Planning your Everett visit: timing, transit, and what to bring
- Who this class suits best (and who may want another option)
- Should you book the Stained Glass Magic Class in Everett?
- FAQ
- Where does the Stained Glass Magic Class meet?
- How long is the class?
- What does the class include?
- Do I need stained glass experience?
- What language is the class offered in?
- How many people are in the class?
- What happens if there is poor weather or you need to cancel?
Key highlights from this stained glass class

- Pick from ready-to-go templates so you can start quickly
- Supplies are included, which cuts down on planning and extra costs
- Copper foil, hanger, and soldering are part of the real build process
- Small class size (max 4) means more direct help when you ask
- You leave with a finished piece you can hang right away
Stop at FEELartistic Studio: where you make it, not just watch it
Your class starts and ends at FEELartistic Studio, located at 10333 19th Ave SE STE 101, Everett, WA 98208. That single-studio setup is a practical plus. No hopping across town, no waiting around between stops, and no transit stress mid-class. You simply show up, get settled, and work through your stained glass project.
The studio is described as near public transportation, which is helpful if you want to use transit instead of driving. It is also designed so most travelers can participate, which matters if you are deciding whether this is a “skill barrier” kind of workshop. The class is open to all, and the structure is built for beginners.
One more practical detail: this experience has a maximum of 4 travelers. That small group size changes the whole feel. You are more likely to get the exact kind of correction that prevents a frustration spiral later, like when a step doesn’t look right and you need a quick fix before you move on.
You can also read our reviews of more tours and experiences in Seattle


Picking your design template and getting oriented fast
The first phase is simple: you select a design from available templates. This is one of my favorite parts of this format because it reduces the time sink. You are not spending the first part of the class stuck on “what should I make?” Instead, you start building with a clear plan.
From there, the class moves into the step-by-step flow. You are given all the supplies, which likely includes the glass pieces and the materials you need to complete the method taught during the session. That inclusion is more important than it sounds. It means you are not balancing a trip to a craft store with your class time. It also means the pieces and materials are set up to work together in the same process you will be taught.
The studio emphasizes clear instruction, and the tone from the experience stories is warm and easygoing. The instructor team welcomes you, then breaks down the work into steps you can follow without feeling lost.
A possible drawback to note: because you are choosing from templates and learning the process in one session, your final piece is meant to be a small, completed stained-glass item rather than a huge wall-sized project. If you were hoping for a long, elaborate build, this class is not that kind of time investment.
Copper foil, a hanger, and soldering: the core skills you will actually use
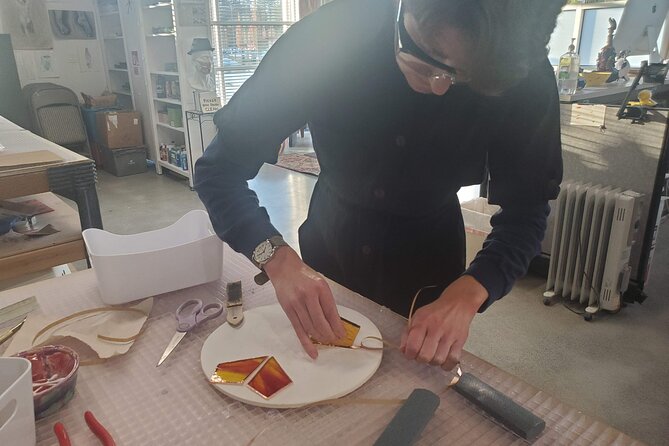
Here is where the class earns its name: you are not just tracing shapes. You are doing the key stained-glass steps that make the craft work.
The process you will work through includes:
1) adding copper foil
2) adding a hanger
3) soldering the glass pieces
Each of those steps turns stained glass from “pretty idea” into “physical object with staying power.”
Adding copper foil
Copper foil is a big deal because it is the step that helps the glass pieces bond properly. In a beginner class, the value is that you learn what to do, not just that it exists. When instruction is clear, this step stops feeling mysterious. It becomes something you can repeat on your next project later.
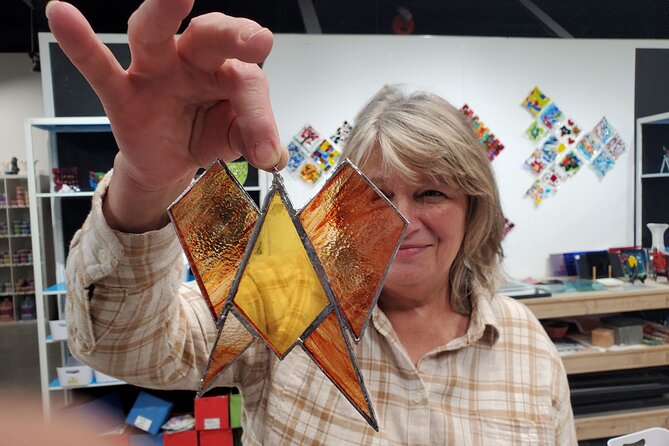
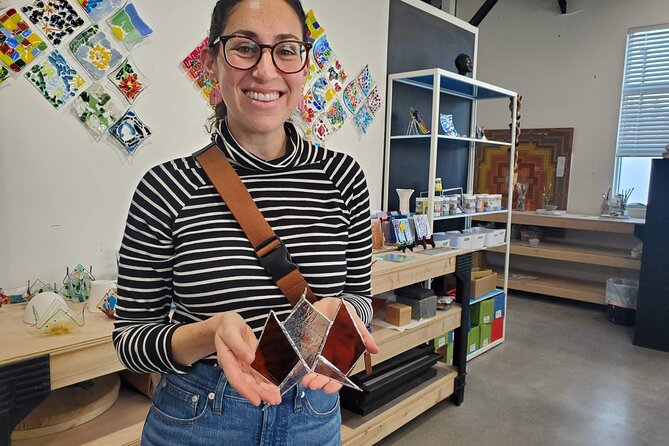
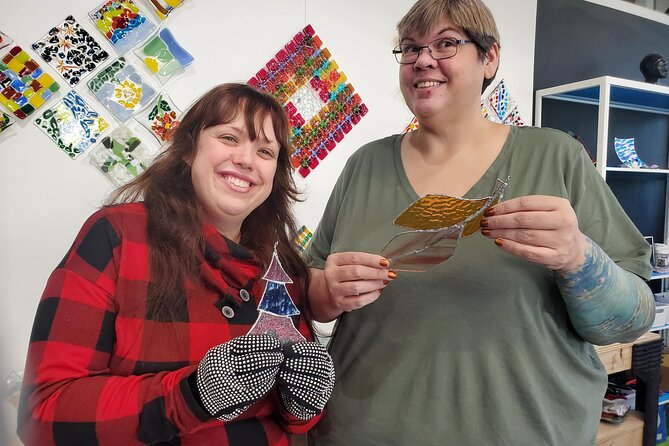
Adding a hanger
The hanger step is the moment your project starts turning into something you can actually use. In the stories from the class, people made hanging art they can place up on a Christmas tree, and the design choices include other options too. Even without naming every template, you can take from this that the class is meant to produce a display-ready item, not a craft “in progress.”


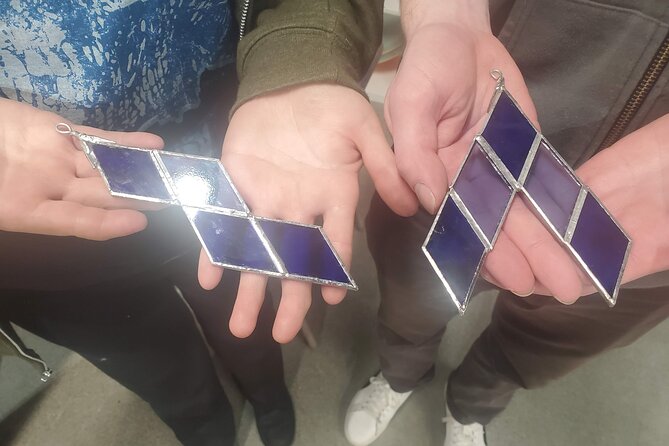
Soldering the glass pieces
Soldering is usually the step people think they will mess up. That is exactly why guided help matters. You add the foil, you assemble the glass pieces, and then you solder the pieces together as taught in the session. If you are nervous about this part, you will probably feel better once you see that the instruction is paced and you are not thrown into it without guidance.
By the end of the session, the goal is clear: you can walk out with your stained glass project. That take-home finish is what makes a class like this worth it. You are not leaving with a kit that demands you find time later.
Why a max-4 group makes the instruction feel relaxed
The class caps at 4 travelers, and it matters. In bigger classes, you can get stuck in a line: wait your turn, then try to catch up. Here, the small group size increases your odds of getting help when you ask.
The overall vibe is described as laid back, and the instructor welcomed participants warmly. Clear instruction showed up as a recurring theme, along with help when it was needed. That is the combo you want in a workshop: calm environment plus real coaching.
If you like interactive learning, this is also a good style of class. You will be actively working on your own piece the whole time. That tends to keep the experience engaging, and it also makes the learning stick. You do the steps, you see results, and you leave with proof.
One note for expectations: the class is 1 hour 30 minutes. In that time, the studio can teach the core steps, but it cannot turn everyone into a master glassworker. Think of it as learning the basics of process and technique so you can build confidence afterward.
Price and value of the $89 workshop with supplies included
The price is $89.00 per person for about 1 hour 30 minutes. On paper, it is not the cheapest activity. But you should judge it by what you actually get.
You get:
- a design template choice
- all supplies provided
- step-by-step instruction
- the core build steps (including copper foil, hanger, and soldering)
- a finished stained-glass item you can take home
That is why this feels like good value for many people. You are paying for guided creation plus materials. If you tried to replicate this at home without a course, the “hidden” costs can add up fast: supplies, tools, and time wasted on trial-and-error. Even if you have craft experience, doing it wrong the first time can cost more than a class would.
This also helps if you are visiting from outside the area. You are not hauling fragile supplies or figuring out where to buy what. You show up, work during the class, and leave with your item.
Booking timing is worth a quick mention. On average, this class is booked about 7 days in advance, so if you want a specific day, give yourself a little buffer and book sooner rather than later.
Planning your Everett visit: timing, transit, and what to bring
This workshop is based entirely at FEELartistic Studio and runs about 1 hour 30 minutes, so you can build your day around it easily. Since it ends back at the meeting point, you are not dealing with the awkward “where do we go next?” question.
It is near public transportation, which is helpful for budgeting your day and avoiding parking stress. Still, if you drive, plan to arrive a few minutes early. You want time to check in and settle before the build begins.
What to bring depends on what the studio provides, and the data we have only says supplies are provided. It does not list a required “bring your own” item. So I would treat this as a show-up-and-work class: wear comfortable clothes and expect to be hands-on.
Also keep the weather note in mind. The experience description says it requires good weather and that if it is canceled due to poor weather, you will be offered a different date or a full refund. That sounds more like a general policy for the booking platform than a description of the classroom itself, but it means you should check your confirmation details close to the day.
Who this class suits best (and who may want another option)
This is a great match if:
- you are a true beginner and want guided steps
- you have done a beginning stained glass class before and want a refresher
- you want a take-home project rather than a lecture or demonstration
- you like small groups and the chance to ask questions during work
It may not be ideal if:
- you dislike hands-on making
- you only want to observe and not participate
- you are hoping for an all-day, complex build
If you are traveling with a partner, this could also work well. The stories include a husband and wife pairing, and the small group size helps keep the experience personal rather than chaotic.
Should you book the Stained Glass Magic Class in Everett?
I think you should book if your goal is to learn by doing and leave with something real. The strongest reasons are the same reasons people seemed happiest: warm welcome, clear step-by-step instruction, and the satisfaction of finishing your own hanging stained-glass piece. The supplies are included, the group stays tiny, and the class is short enough to fit into a day without turning your vacation into a full-time job.
Book it soon if you want a specific time, since it averages about a week out. And if you are the type who needs a gentle, structured start to crafts, this studio setup is exactly that.
If you want a big, multi-session project, or you only want to watch, look elsewhere. But for a beginner-friendly stained glass session with a take-home result, this is a practical, satisfying choice in Everett.
FAQ
Where does the Stained Glass Magic Class meet?
The class starts at FEELartistic Studio, 10333 19th Ave SE STE 101, Everett, WA 98208, USA, and it ends back at the meeting point.
How long is the class?
The class lasts about 1 hour 30 minutes.
What does the class include?
You select a design from available templates, receive all supplies, get step-by-step instructions, add copper foil, add a hanger, and solder the glass pieces. You leave with your stained glass project.
Do I need stained glass experience?
No. It is open to all and is ideal for beginners. It can also work as a refresher for people who have taken beginning classes before.
What language is the class offered in?
The class is offered in English.
How many people are in the class?
The maximum group size is 4 travelers.
What happens if there is poor weather or you need to cancel?
You can cancel for a full refund up to 24 hours in advance. If the experience is canceled due to poor weather, you’ll be offered a different date or a full refund.